Showing posts with label my projects. Show all posts

Thursday, January 7, 2021

Books read in 2020

Books read in 2020 - only about 50 so at least I met my minimum goal.

Lowering my expectations for 2021 just in case

My MTO Goal for reading in 2021 is M: 35, T: 50 and O: 75

Follow me on Goodreads =)


My favorite book from the year was probably Midnight Sun by Stephanie Meyer. I loved the perspective and hope she continues and does more in this perspective. It was super detailed since it dealt with all of Edward's thoughts along with everything going on.

Tuesday, February 11, 2014

Valentine Giant Cards Tradition

I saw this idea somewhere, probably on Pinterest, and thought we'd start the tradition. Last year I bought the Jumbo Giant Valentine Cards and every year we'll write a little note of love to each other and to our kids. Then  you can  go back and see past years. This could easily be done for birthdays and other holidays too.


My son chose the dog valentine for himself and the bears for his sister. My husband and double up on the hearts one since there wasn't that many choices left for the Jumbo Cards.

Sunday, February 9, 2014

Valentine "Diamond" Kiss Rings

Thanks to the idea from Keeping it Simple and the tutorial at Mom on Time-out, I made these fun Valentine Rings for my Young Women lesson on adversity a couple years ago.

One thing we talked about was coal being turned into diamonds through intense heat and pressure for a long period of time and how this relates to trials and adversity.

These rings were a little treat to remember that they are each being turned into diamonds by our Heavenly Father. Trials are needed to help us grow, learn, and progress.


Saturday, February 1, 2014

Books Read in 2013

Here's what I read in 2013!

77 BOOKS! I reached my first goal of 50 and then hit another goal of 75 Some were novellas ---- I didn't count picture books.


This year I have a good start of 15 books! WOW I'm impressed with myself. HAHA!

What have you  been reading? What were your favorites last year?

My favorites were the Matched Series, The Kissing Tree, Edenbrooke, Austenland, and books by Jenni James.

Tuesday, January 28, 2014

Valentine's - Princess and Super Hero Suckers

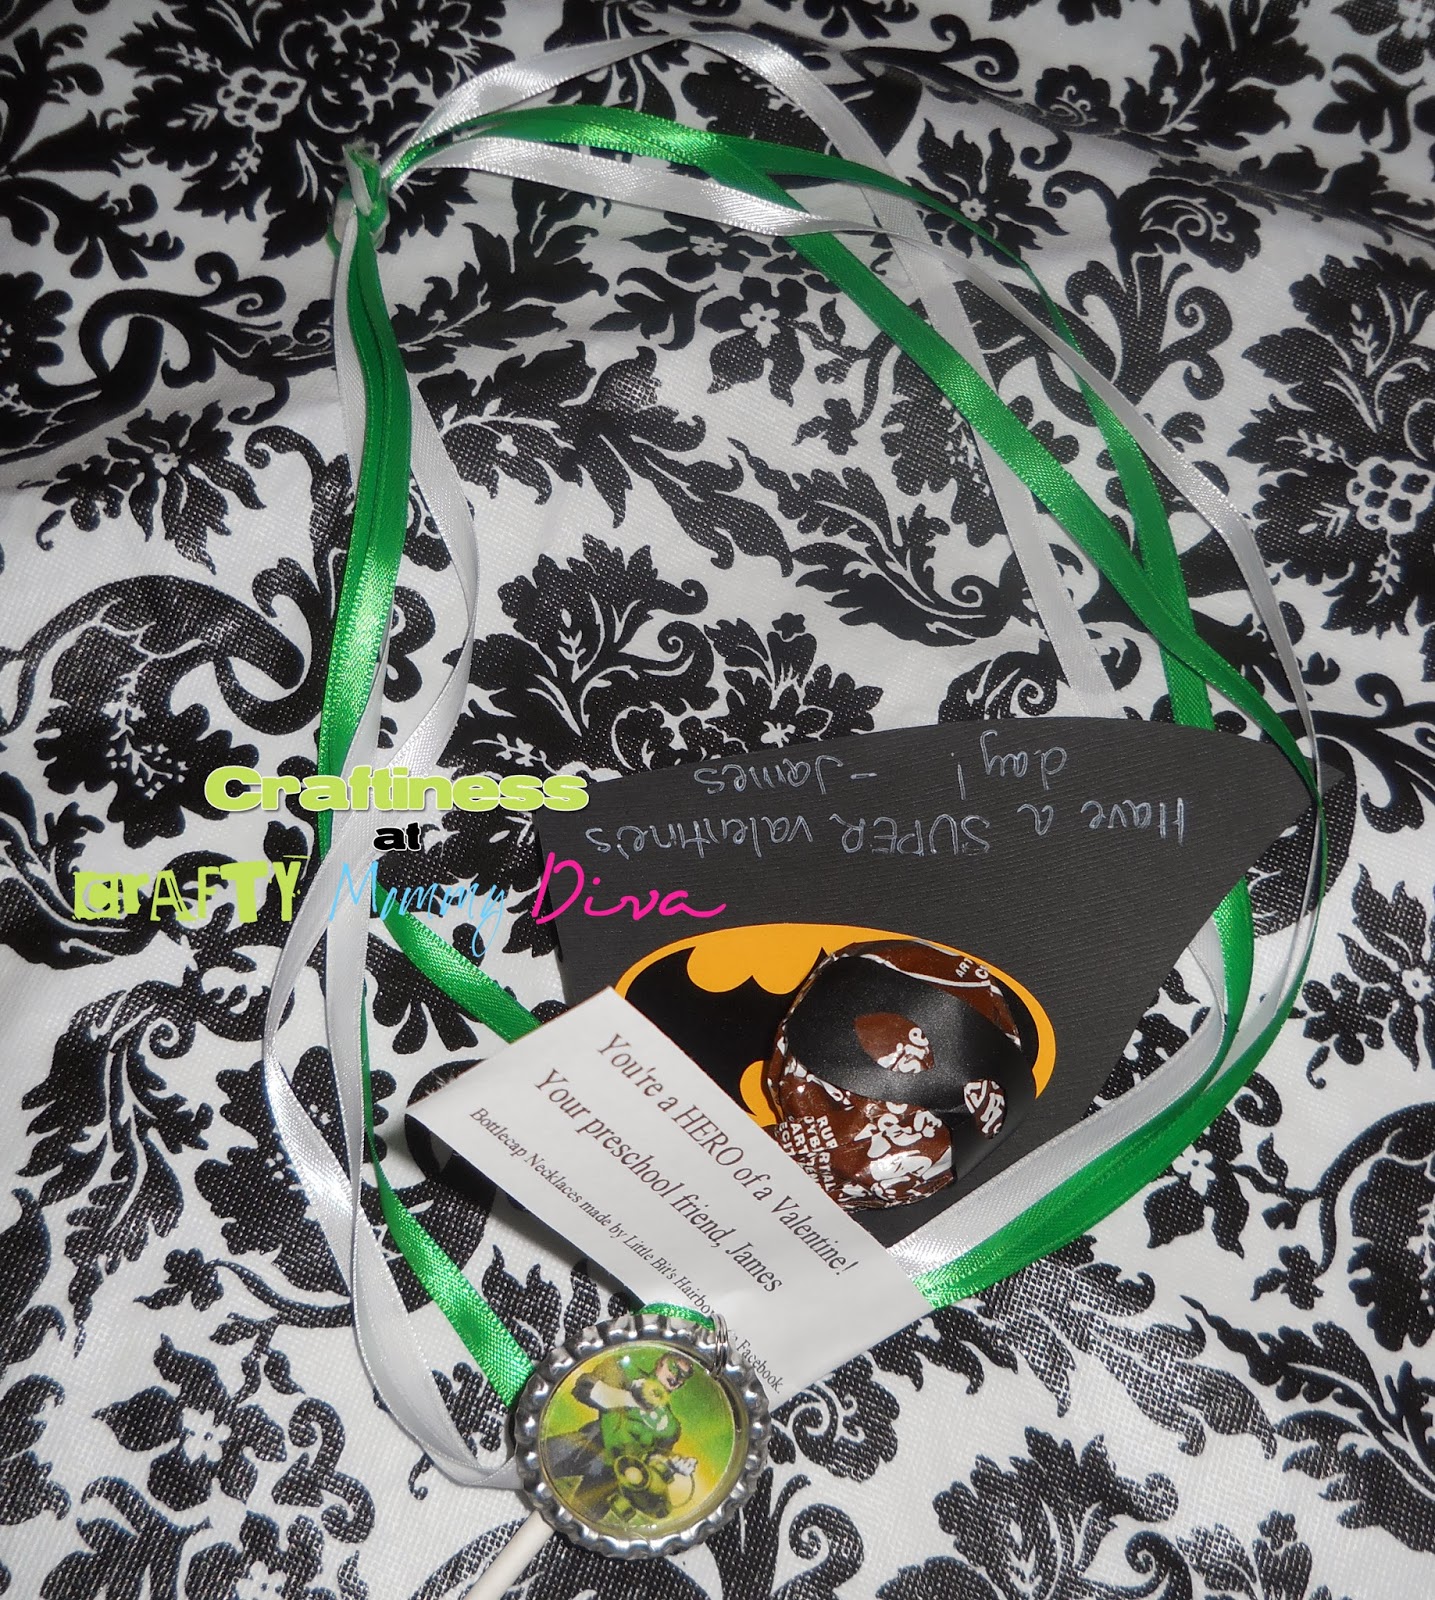
Last year for Valentine's Day, I bought these bows and bottlecap necklaces for $1 each from Little Bit's Hairbows. She is doing the special again this year until February 1st. She also does Easter Basket sets.

Then I saw these SuperHero suckers from Keeping it Simple so I got creative.

I made the SuperHero suckers using my Silhoeutte- but only sticking to the ones that actually have capes =)

Then for the girls, I clipped their bow to their sucker for "Princess/Diva" Suckers  for the girls


I stuck them all in a small box with holes made with my Crop-a-Dile.

With the superhero suckers for friends, I added the super hero bottle cap necklaces. =)


For his teacher, I followed Keeping it Simple's example and made Hershey Kiss Roses. Her use of the pencil worked so much better than another tutorial I tried to follow about 3 years ago. I added a paper wrap to make it even prettier.

Since his preschool teacher also does gymnastics in her curriculum, I wrote this poem.

"Roses are Red
Violets are Blue

You're a great teacher
and awesome at gymnastics too!"

His teacher is pregnant this year, and she can still do cartwheels weeks before she's due!


Thursday, December 12, 2013

Chrstimas Stockings

Since my great grandma made me my cute stocking many many years ago, I've been wanting to have cute stockings for my  kids.

So last Christmas I made these stockings using fabric, heat bond, pom poms, ric rac and my Silhouette =) I love them!

Wednesday, December 4, 2013

Vinyl Ornaments

I made this last year for a 2 year old's birthday - her birthday is in December and she had a Princess party.

Used my Silhouette for the vinyl and put some princess stickers on the inside.

I also made Silhouette ornaments with vinyl last year for my learning group kids.

I first took side profiles of the kids. In Photoshop, I selected their head, filled it with black, smoothed edges, deleted background, and saved as a png. I opened it up in my Silhouette machine, traced it and cut it out along with their name and date.


As a child I used to make bead ornaments with my parents. I hope to keep up of the tradition of making ornaments for people with my kids in the future.

Tuesday, November 26, 2013

Applique B Onesie

I made this easy little B initial onesie shirt for a fellow crafter's sister's baby shower. Easy to cut out the fabric and Heat Bond with my Silhouette. Then sewed around it just in case.


Thursday, May 9, 2013

Project Organization 2013 - Bathroom Drawers and Kitchen Cabinets

All this took me basically a whole day to clean and organize. First I went and measured my cabinets and headed to the dollar store for containers that would fit. I was lucky to find sizes and colors that would work just at the Dollar Store! No ordering custom or expensive containers.

Before and After Bathroom Drawers
Closed Tupperware Pieces were perfect for the cotton ball and Q-tips plus my 2 year old couldn't get to it. She's been getting to the Q-tips and sticking them in her ears so we worried she'd end up damaging her ear drums....
Bottom Drawer 3 larger containers for my son's pull-ups for night, tampons and pad. Then a smaller container for most used hair accessories.
Top drawer was thinner so several years ago, I bought a desk compartment tray during back to school time to sore my earrings, combs, hair ties, bobby pins and more.

Bathroom Cabinets
My husband's on the right and mine on the left. I have all the medications on my side though we don't have very many anymore know that we use natural solutions. My side still could use some work, but the cabinets are larger in the back and narrow towards the front which makes it difficult to fit many containers in there.


Kitchen Cabinets Before
I always buy food items and just stuff it where there's room which made me forget what I had a lot! Since seeing all these organization posts, I knew I had to try containers but I was really afraid I'd have to spend tons of money, but thankfully I found dollar store containers that fit perfectly! I think I spent $35 on 35 containers for the bathroom drawers & cabinets, kitchen cabinets, and a few for the fridge. Money well spent for my sanity and very affordable.

 Kitchen Cabinets After
I just love opening up my cabinets, brings me so much accomplishment!
Since I don't have a ton of spices and couldn't really afford or have fit a circular spice rack, I just fit all my spice straight across one shelf, after throwing away the really old ones...
Kept the can goods on the bottom shelf.
Then I had containers for cooking items, noodles, cookies, chips, vitamins, cooking spray & small oils, seasoning packets.
Technically I can't fit as much food, but it's so much more organized and I can really see what I need to buy. Prevent over buying so I can better stick to a budget =)
Some things went into our lazy susan which are pretty easy to keep organized - then the popular cereals went in the table top cabinet. No I'm not a big fan of plain Cheerios, but the rest of my family eats it every day. I'm more Honey Nut kind, sometime Multi-grain =)


Before and After of Table Top Cabinet

Before and After of Main Cabinets


Fridge still needs some work and freezer needs a ton, but we'll get there. Any ideas for the freezer? It's tiny! I always overshop for it and ended up moving everything around for it. Wish we had a place for an extra freezer.
On the top shelf of our fridge, it's usually full of milk. My family drinks a lot of it - just need to shop for more this week.


The rest of my living and kitchen area. Some things from the main cabinets were moved to my scrapbook room and others were moved to my bookshelf under the clock. This part took me a couple hours to do without the kids around. It might have taken all day with them home!

Tuesday, February 12, 2013

Orange and Yellow Wedding Gift

I made these canvases for a wedding present. Their colors were orange, yellow and grey.


Also I helped come up with an arrangement for some of the decor at the wedding...
It was so fun =). She originally had a very symmetrical design like a mirror image, but I cam up with this more asymmetrical design. What do you think?

Thursday, January 17, 2013

Shutterfly Dimensional Wall Art

I love Shutterfly! I can't say that enough! I had a nice e-mail saying I got $20 off coupon. I decided to go big and get this Dimensional Wall Art that was 20%. Plus since my order was over $30, I got free shipping. I can't wait to get it in the mail. 10x15 Wall art for $46.


Dimensional wall art
View the entire collection of cards.

Wednesday, January 9, 2013

My First Vinyl with my Silhouette

"You know you're in LOVE when you can't fall asleep because reality is finally better than your DREAMS." - Dr. Seuss

One of my favorite quotes - a perfect choice for the first vinyl I personally made with my Silhouette.


Photo by The Turquoise Frame Photography


I'm Topsy Turvy

Wednesday, December 19, 2012

Christmas Fabric Ruffle Totes

Here are some Christmas Fabric Ruffle Totes I made recently. I love doing these mini totes - super quick and easy for me =)
Here's the tutorial again if you haven't seen these: http://www.scatteredthoughtsofacraftymom.com/2012/02/no-sew-ruffle-tote-with-tutorial-and_22.html

For mine, I just use my Pinking Shears to cut all around the fabric instead of folding it. Also I don't make marks, I just move it together and see where it ruffles - that way I always have a unique tote =)...or I'm just lazy =D

A large one would make a great gift - fill it with crafting/sewing supplies for that crafter in your life.
Or make a mini one - perfect for a little girl. Fill it with candy, little toys, and more. I think I'll make some for my son's preschool class since they're mostly girls in his class!


Thursday, December 13, 2012

Paper Wall Flowers

I was inspired by these Scrapbook Wall Flowers pinned here. I made these for my second Saturday scrapbook class I teach =). These were back from May! Sometimes I make so many projects at once that I forget to post about them =).


Instead of using cardboard, I used the wooden flowers that I bought from Pick your Plum a while ago.

Then I followed her tutorial for the most part. =)

I used my trusty glue dots to hold the petal down, but hot glue may have been better since these are pinched. I laid them out on my wooden flower to see how it wood look.


On the back of the wooden flower, I added a bunch of flat flowers. For the center, I used scrap strips like a pinwheel. Then I added some bling to the petals. Then I made a second flower that exposed more wood instead of covering it all with paper. I used a circle stamp for a textured look.

Tuesday, October 9, 2012

Shutterfly Birthday Cards

I love using Shutterfly to send birthday greetings especially because for about $1 more, they'll address and send the card for you. Super easy and time saving!

Here's a card we sent to my father-in-law. I've sent ones to my sister-in-law, brother-in-law, and mom in the last month. They love them because of the cute pictures we can put on them to make them more personal. 


5x7 Folded Card
View the entire collection of cards.

Tuesday, September 4, 2012

Rocking Chair REDO

Here is my rocking chair I spray painted! This was my very first spray painting experience. I was super nervous!

Here's the chair before. Our neighbors who moved just gave it to us because they wouldn't have room in their new place.


I did lots of research and asked some favorite bloggers about spray painting before I got started. Here are my pins with tips I found - pin 1, pin 2 
I decided to do my rocking chair first because one of my favorite bloggers, Keeping it Simple,  redid some chairs with spray paint so she inspired me to do my rocking chair. Pinned here.

I spray painted early in the day. Layed down the groundwork in my driveway.


I used a dark chocolate brown spray paint with primer from Krylon - I was told don't go cheap on spray paint so Krylon and Rustoleum are pretty good. I really wanted a cherry brown, but couldn't find one. I also couldn't find a separate primer spray paint so I figured the spray paint with primer would be better than one without primer. I used 2 cans of it to cover all the crevices with the chair.


I let it dry outside for the rest of the day. Then I brought it inside and put it somewhere where my kids don't go too often so it could dry some more - for about a week. Then I felt comfortable having it to sit on.

It's not perfect, but I love it! Eventually I'd like to redo the seat cushions as well in turquoise/aqua fabric. I'm  not a great sewer so that will be a while before I attempt it.


Here it is with the rest of our living area furniture. It's a small room so we don't have real couches, just benches, the rocking chair and a glider.


I'm Topsy Turvy